Android bluetooth connection with arduino
12 min
This guide describes how to communicate from Android to Arduino using bluetooth communication. It describes the process of creating an application which notifies the user if the noise level is above a certain limit. Data is gathered from a sensor on the Arduino (KY-038). Bluetooth communication with (HC-04)
All of the code used in this guide can be found on the following GitHub links:
| Platform | Repository |
|---|---|
| Android | github/MelleDijkstra/SmartVolume |
| Arduino | github/MelleDijkstra/ArduinoProjects/bluetooth-soundsensor |
There are numerous ways to have a wireless connection between devices. One of them is bluetooth, which is actually quite easy to implement in Android. In this guide, I’ll show you how to connect to a paired bluetooth device with the Android API.
Android has a specific API for Bluetooth connection. For in-depth information refer to their API guide https://developer.android.com/guide/topics/connectivity/bluetooth.html
Prerequisites
- Android device
- Arduino
- Bluetooth module for Arduino (preferably the HC0x series, which is what I use. The HC04 to be specific)
Concept / Scenario
I’ve chosen for the “classic bluetooth”, simply because it’s the simplest way of implementing bluetooth with Android. I’m using the bluetooth connection to have a constant connection (stream) with the Arduino. I’m not implementing bluetooth discovery. The user has to pair the devices first!
The concept is that I have a sensor on the Arduino which measures surrounding noise. Then with a bluetooth module connected to the Arduino, I send the information to any device which connects via bluetooth. Which is the Android app in this case. However, from the Android perspective, this can be used with any bluetooth device.
Then in Android, the user can specify a specific threshold for the noise level. Once the level indicated by the sensor is higher than the given threshold, the application will notify the user in the forms of a dialog, beep sound and vibration.
Steps Android
Step 1 - Following the Android guide
I’m not going to repeat everything from Google’s guide. Google already does a great job explaining in its own guides. If you have never setup bluetooth with Android before, be sure to read that first. https://developer.android.com/guide/topics/connectivity/bluetooth.html#SettingUp
Instead of explaining how to use bluetooth in Android, I will be explaining how I implemented the bluetooth connection in this specific scenario.
We need permissions to use bluetooth & vibrate in the application:
<manifest ... >
    <uses-permission android:name="android.permission.BLUETOOTH" />
    <uses-permission android:name="android.permission.BLUETOOTH_ADMIN" />
    <uses-permission android:name="android.permission.ACCESS_COARSE_LOCATION" />
    <!-- because I want to vibrate the device when threshold is too high, I need that permission too -->
    <uses-permission android:name="android.permission.VIBRATE"/>
    ...
</manifest>
Step 2 - Android Code
The Android part consists of 2 parts. The user interface (UI) and the Bluetooth connection. These will communicate with each other.
Step 2.1 - User Interface
The interface is simply a single activity with the following fields:
public class MainActivity extends AppCompatActivity {
    // A unique request code which identifies that a result was from a enable bluetooth request
    final int REQUEST_ENABLE_BT = 32456;
    // The bluetooth adapter class which can be used to communicate with the bluetooth module
    // on this device
    private BluetoothAdapter mBluetoothAdapter;
    // The TextView which displays the current noise level
    public TextView lblNoiseLevel;
    // The dialog which pops up when the noise level is above the threshold
    AlertDialog dialogTooLoud;
    // The threshold value which is compared to the noise level
    private int threshold = 100;
    // The unique identifier for the threshold SharedPreference, so it is persistent even if the application is closed
    private static final String PREF_THRESHOLD = "nl.melledijkstra.smartvolume.THRESHOLD";
    ...
In onCreate I retrieve the bluetooth adapter of this device:
mBluetoothAdapter = BluetoothAdapter.getDefaultAdapter();In onStart I retrieve the current threshold value from persistent storage (shared preference).
SharedPreferences prefs = getPreferences(Context.MODE_PRIVATE);
threshold = prefs.getInt(PREF_THRESHOLD, threshold);
The user can update this preference when clicking on the Settings option in the toolbar. For the exact implementation of this functionality refer to the repository.
I left in the default FloatingActionButton which is implemented when you create a new Android application. When the button is clicked I check if bluetooth is enabled, if so select a bluetooth device to connect with, if not, enable bluetooth first.
@Override
public void onClick(View view) {
    if (mBluetoothAdapter != null) {
        if (mBluetoothAdapter.isEnabled()) {
            selectBluetoothDevice();
        } else {
            Snackbar.make(view, "Setting up bluetooth!", Snackbar.LENGTH_LONG)
                .setAction("Action", null).show();
            Intent enableBtIntent = new Intent(BluetoothAdapter.ACTION_REQUEST_ENABLE);
            startActivityForResult(enableBtIntent, REQUEST_ENABLE_BT);
        }
    } else {
        Toast.makeText(MainActivity.this, "Your device doesn't support bluetooth, sorry!", Toast.LENGTH_SHORT).show();
    }
}
When selectBluetoothDevice() is run I show a dialog with the option to select a paired bluetooth device. The chosen bluetooth device is then used to communicate.
/**
* Make the user select a bluetooth device
*/
private void selectBluetoothDevice() {
    // Get list of paired devices
    Set<BluetoothDevice> pairedDevices = mBluetoothAdapter.getBondedDevices();
    final ArrayList<BluetoothDevice> btDevices = new ArrayList<>();

    if (pairedDevices.size() > 0) {
        // There are paired devices. Get the name and address of each paired device.
        final ArrayList<String> deviceList = new ArrayList<>();
        for (BluetoothDevice device : pairedDevices) {
            btDevices.add(device);
            deviceList.add(String.format("%s - %s", device.getName(), device.getAddress()));
        }
        // Show them in a dialog to choose from
        final AlertDialog.Builder builder = new AlertDialog.Builder(this);
        builder.setTitle("Device List")
            .setItems(deviceList.toArray(new CharSequence[deviceList.size()]), new DialogInterface.OnClickListener() {
                @Override
                public void onClick(DialogInterface dialogInterface, int i) {
                    new BluetoothSocketThread(MainActivity.this, btDevices.get(i)).start();
                }
            });
        builder.create().show();
    } else {
        Toast.makeText(this, "No paired devices", Toast.LENGTH_SHORT).show();
    }
}
If bluetooth is not enabled and a request was made to enable it, the result will call onActivityResult. In this method, I check if the request was made for enabling bluetooth. If the result was OK then select a bluetooth device because bluetooth is now enabled. If the result was not OK then notify the user that this application needs bluetooth to function properly.
@Override
protected void onActivityResult(int requestCode, int resultCode, Intent data) {
    // If the requested bluetooth was correctly enabled, then ask user to select device
    if (requestCode == REQUEST_ENABLE_BT && resultCode == RESULT_OK) {
        selectBluetoothDevice();
    } else if (requestCode == RESULT_CANCELED) {
        Toast.makeText(this, "Bluetooth is needed for this application", Toast.LENGTH_SHORT).show();
    }
}
Then the final step is checking the noise level. I have chosen to put this functionality inside the activity but it could also be transferred to the BluetoothSocketThread (which I will discuss in a bit).
However keep in mind that actually updating the UI should never be done in a separate thread!
/**
 * Check if the measurement is above the threshold
 * @param latestMeasure The latest measurement
 */
public void checkNoiseLevel(int latestMeasure) {
    // if the measurement is over threshold and dialog isn't already showing to the user
    if(latestMeasure > threshold && !dialogTooLoud.isShowing()) {
        // These different types of alerts need to get attention from the user
        dialogTooLoud.show();
        // Generate a 1 second tone
        ToneGenerator toneG = new ToneGenerator(AudioManager.STREAM_ALARM, 100);
        toneG.startTone(ToneGenerator.TONE_CDMA_ALERT_CALL_GUARD, 1000);

        Vibrator v = (Vibrator) getSystemService(Context.VIBRATOR_SERVICE);
        // Vibrate for 500 milliseconds
        if (v != null) {
            v.vibrate(500);
        }
    }
}
Step 2.2 - Bluetooth Socket
The bluetooth part is a single class which handles all the communication with the bluetooth device in a new thread.
It receives a android.bluetooth.BluetoothDevice and creates a connection with it. Followed by an infinite loop for receiving the new measurements in the background. When a new measurement arrives, it sends the latest measurement to the activity (in the UI thread) which in turn does the noise level check.
public class BluetoothSocketThread extends Thread {
	// The bluetooth device (HC-04)
    private final BluetoothDevice bDevice;
    // A socket used to communicate with the device
    private BluetoothSocket socket;
    // The activity on which UI functionality should be run
    private final Activity activity;
The communication with the HC04 needs a unique ID. Here a quote from @nullpotent at StackOverflow:
https://stackoverflow.com/a/13977356/3298540
It usually represents some common service (protocol) that bluetooth device supports.
When creating your own rfcomm server (with
listenUsingRfcommWithServiceRecord), you should specify your own UUID so that the clients connecting to it could identify it; it is one of the reasons whycreateRfcommSocketToServiceRecordrequires an UUID parameter.Otherwise, some common services have the same UUID, just find one you need and use it.
See here
Next up is the actual run method which does all the communication work with the bluetooth device and notifies the activity that a new measurement has arrived. It should be self-explanatory, also I have added some comments to explain it a bit more. I have removed some code which doesn’t add value to understanding my implementation (if you really want the complete code, please check the repository).
	// The unique service identifier for the HC-04, this could be different for other bluetooth devices
    // @see https://stackoverflow.com/questions/14071131/android-find-the-uuid-of-a-specific-bluetooth-device
    private static final UUID HC_04_UUID = UUID.fromString("00001101-0000-1000-8000-00805f9b34fb");

    BluetoothSocketThread(Activity activity, BluetoothDevice device) {
        this.activity = activity;
        this.bDevice = device;
    }

    @Override
    public void run() {
        // Always cancel discovery before connecting (from google android guide)
        BluetoothAdapter.getDefaultAdapter().cancelDiscovery();
        InputStream inputStream = null;
        try {
            // Create the communication socket with the bluetooth device
            socket = bDevice.createInsecureRfcommSocketToServiceRecord(HC_04_UUID);
            socket.connect();
            inputStream = socket.getInputStream();
            BufferedReader in = new BufferedReader(new InputStreamReader(inputStream));
            while (socket.isConnected() && !interrupted()) {
                // This actually reads the new measurement value from the Arduino
                final int latestMeasure = Integer.parseInt(in.readLine()); // blocking call!
                activity.runOnUiThread(... // Runnable
                        // Update the UI with new value
                        ((MainActivity) activity).lblNoiseLevel.setText(String.format(Locale.getDefault(), "%d", latestMeasure));
                        // Check the noise level with threshold and notify if needed
                        ((MainActivity) activity).checkNoiseLevel(latestMeasure);
                ...);
            }
        } catch (IOException e) {
            // Show a Toast if we could not connect to device
            ...
        } catch(NumberFormatException e) {
            // When the received number could not be parsed
            e.printStackTrace();
        } finally {
            // close sockets & streams
            ...
        }
    }
}
That’s it for the Android part!
Steps Arduino
Step 1 - Building the circuit

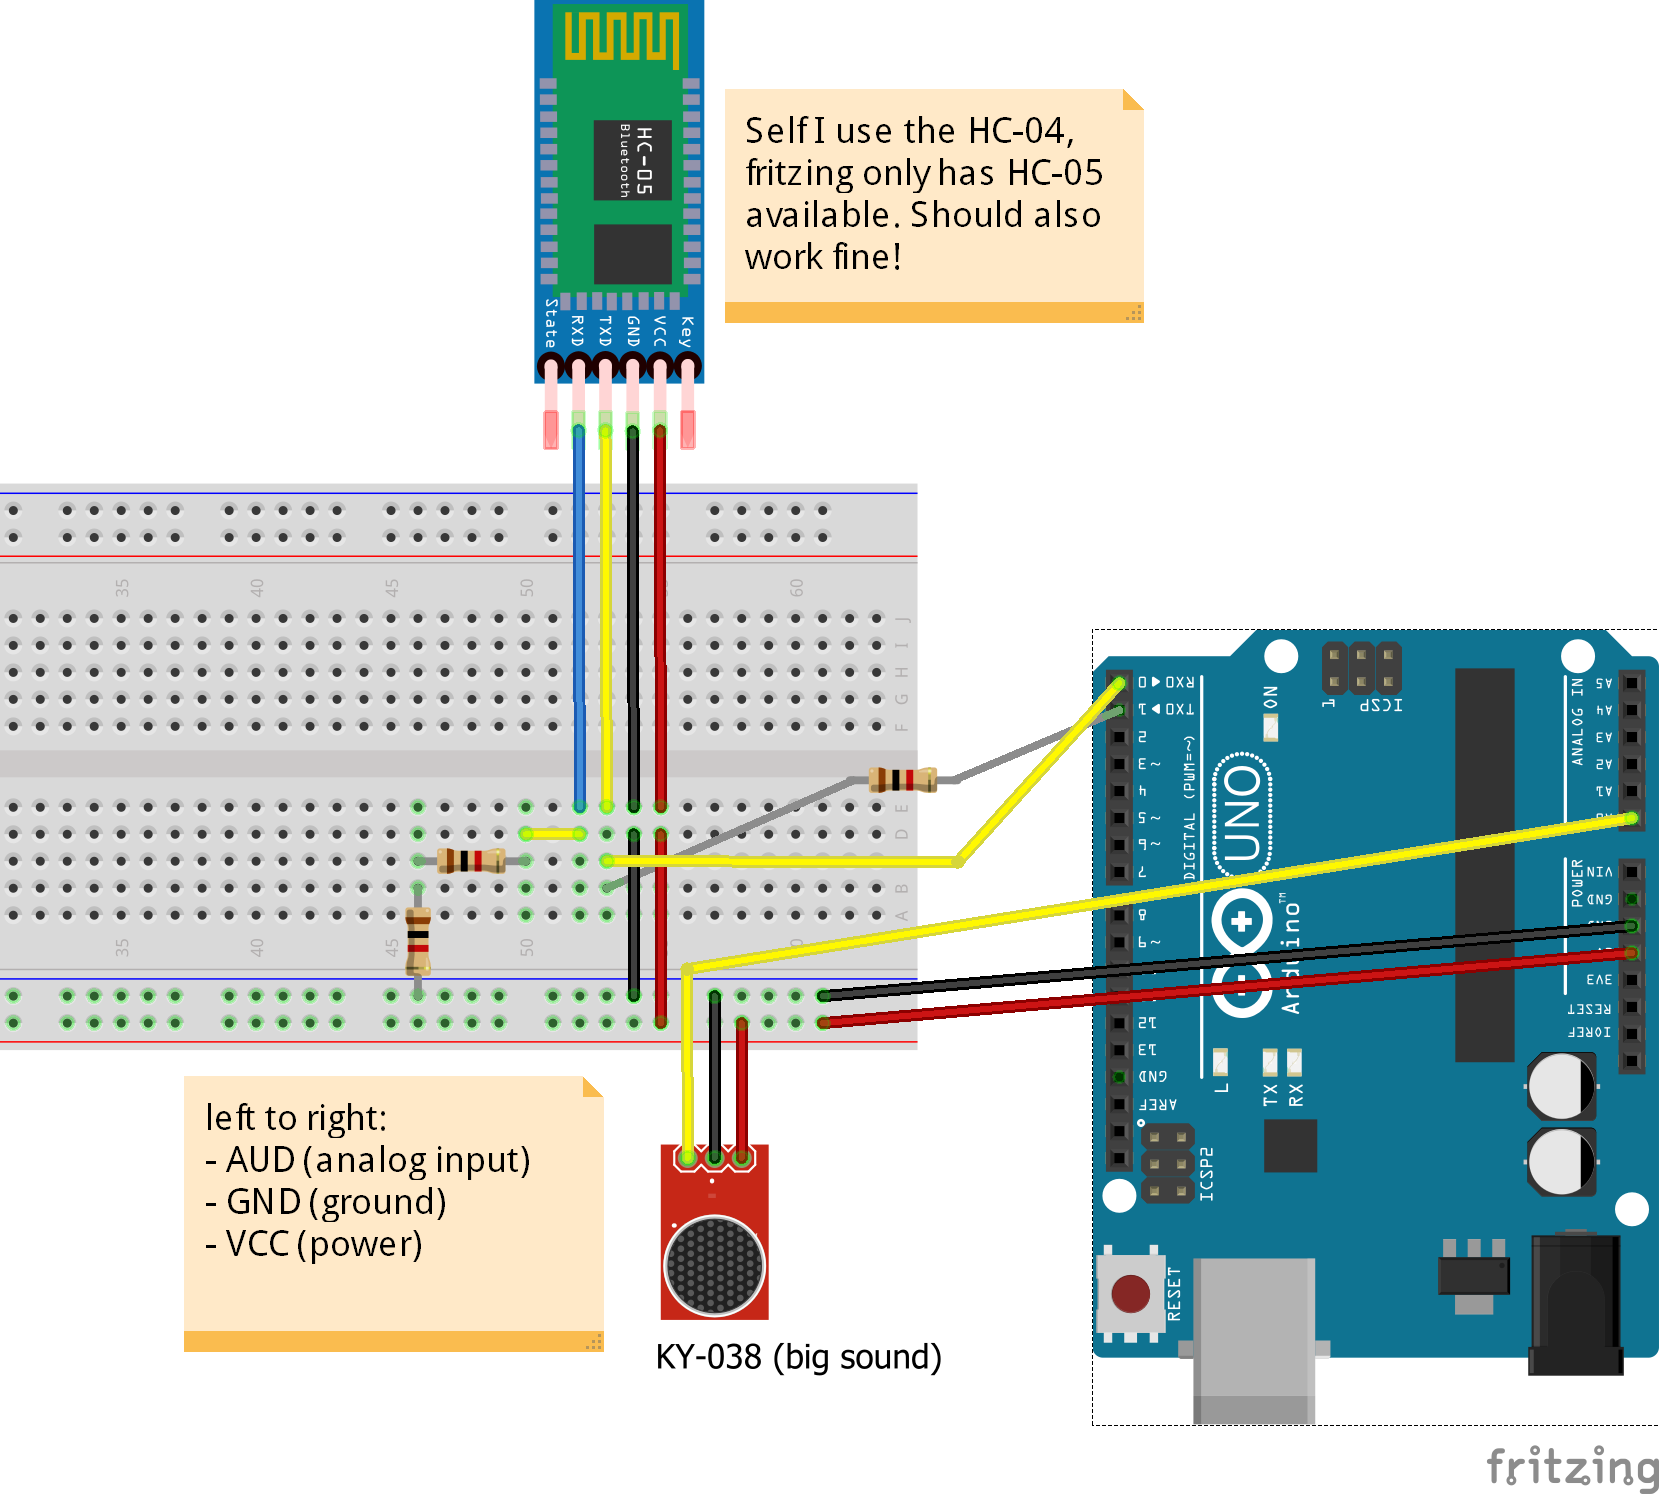
The sound sensor that I use is the KY-038 (Also called “big sound”).
The image should already give a good interpretation of how to connect the sensor, just connect the + (VCC) to the 5v on Arduino and - (GND) to ground on Arduino and finally connect either A0 to an analog port on Arduino or D0 to any digital port on Arduino.
- Pin + to Arduino 5+
- Pin - (ground) to Arduino - (ground, gnd)
- Pin A0 to Arduino A0 (for analog data)
- Pin D0 to Arduino 13 (for digital data)
Because I’m reading the analog input from the sensor I only use pin A0 from the sensor. Use D0 for digital input which means you only get a HIGH signal when it goes above a certain threshold.
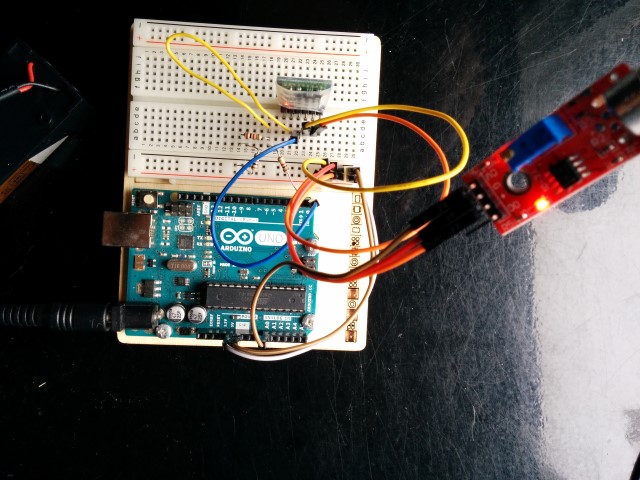
The bluetooth module is the HC-04. Connecting it is a little harder than the sound sensor. It has the following pins to connect:
- STATUS
- RxD (Receive pin)
- TxD (Transmit pin)
- GND (ground)
- VCC (power)
- EN
Because the bluetooth module uses 3.3v for the data connection pins (RX & TX), it can’t handle 5v from the Arduino. So the Arduino TX (transmit) pin which outputs 5v should be divided. This can be done with a 1K ohm resistor and a 2K ohm resistor. For specifics on wiring the HC-04 see howtomechatronics.

Step 2 - Arduino Code
Code explained:
- Setup serial communication. Because the bluetooth module uses serial communication you can just set that up like you would with sending serial data over USB.
- In the loop just keep reading the sound analog signal and send the number over serial communication.
It’s as simple as that. It just reads sensor data and sends it right away. No fancy protocol stuff needed. You could, of course, go a step further by implementing more sensors, or even bi-directional communication.
Here is the code: (as I said, as simple as that)
// the current volume level
int volume;

void setup() {
    // setup serial connection
    Serial.begin(9600);
}

void loop()
{
    // flush just to be sure
    Serial.flush();
    volume = analogRead(A0); // this reads from the sensor
    Serial.println(volume); // this sends the read measurement over bluetooth
    delay(500); // wait a little, so we don't flood our connection with requests
}
Demo
